I was afraid the next part of the renovation would coincide with the lyrics from the new Pompeii song, “And the walls came tumblin’ down…”
Luckily that wasn’t the case.
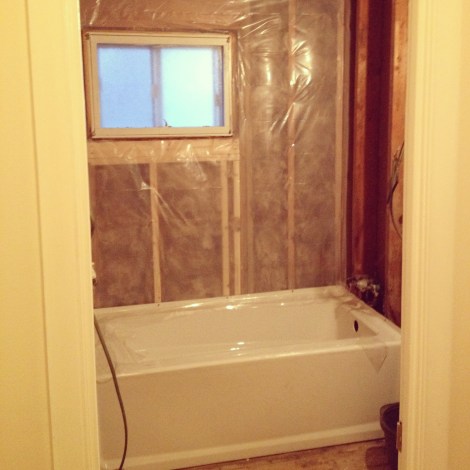
Since our last post when we gutted the place, we have been busy piecing things back together.
First, we had some wood to fix and studs to replace on the outside wall from over 50 years of water damage. Yikes! Here a just a few pictures of that progress…


Once we had everything in we put new insulation in the wall and we also covered it with bath plastic for extra protection against water.
Then our contractor came to install the soaker jacuzzi tub from Lowe’s. Yes, this big box had to go in that space. Not sure how he did it, but he managed to do it without breaking anything! 🙂
Once the tub was in, we took down the old insulation that was in the ceiling and put in fresh stuff with an extra layer in the attic to warm the place up a bit.
Next, our contractor came back a couple of separate days to work on the plumbing and electrical (including installation of a ceiling fan.) We had him switch the location of the vanity and the toilet so that we had more room in our small space. We also had him change the location of the light switch and add more outlets. We only had one outlet before! That is a hair styling crime…
By the way, if you want an amazing fan get a Panasonic. It sounds lame to want a great fan but it will do wonders against mold and water damage and it will be quiet as anything!
Plumbing and electrical: before (notice the LIVE WIRES TAPED TOGETHER…OMG!)

Plumbing and Electrical: After


Since we ended up changing the location of the toilet, there was some sub flooring we had to replace. Once we did that, we were ready to put up the drywall! If you’re doing this you should note to always start with the ceiling. Why? Well its the hardest part and it will also be easier to have clean lines once you go to put the walls up.


Thanks, Dad!

Luckily there was only ONE measuring error by yours truly. It’s not that bad….right? Hehe 😉

Once the drywall was up, our contractor came back to mud the seams and install our new window.
Stay tuned for more blog postings as we get closer to the end of our renovation! Next up: backer board installation and tile! Woohoo!
Have a question or comment on how we did something throughout the process? Comment below!
Love the post. We are headed into our first home renovations, and your post was inspiring and so helpful! Thanks!
Thanks so much @trimthesails! Glad we could help! Feel free to let us know if you have any questions.
A bathroom remodel can be an overwhelming job for any homeowner. Not moving plumbing is a huge time, money and talent saver. You remodel looks great, thanks for sharing!
Thanks so much, Chad! We appreciate the comment. We hope you will subscribe to our blog and follow out social media outlets for more! 🙂
I just wish we had more than one bathroom!
Investigate SANIFLO products. With their items, including a rear vent toilet, you can put a bathroom almost anywhere.
Can you please share with me an estimated/ball park cost of what your remodel was? We are doing almost the exact same thing to our small bath and the quotes we’ve received are very high.
Thanks!
Hi Lisa! We did a lot of the work ourselves but had contractors come in for the electrical and plumbing. It cost around $4,000. I hope this helps and please don’t hesitate to ask any other questions!!
What is the tub made of? Cast iron? Your bathroom looks fantastic.
Hi! Thanks so much – we’re glad you like the bathroom. Here is the link to the tub. Its a Jacuzzi Primo Acrylic Rectangular Skirted Bathtub http://www.lowes.com/pd_364253-69094-P1S6032BRXXXXW_1z0z4hmZ1z10do7Z1z10rzfZ1z13zl6__?productId=3503064&pl=1
I LOVE you bathroom reno. I have a bathroom similar to yours except instead of pink tile mine is greenish yellow. I too would like to move my toilet to the other side of the room, but I hear over and over again that moving fixtures is very expensive. How much of your budget went to the plumber? Thanks, and great job!
what was the time frame for doing this bathroom ? we are wanting to remodel our bathroom and completely start over. when we first purchased this house the bathtub and toilet were DISGUSTING so we put brand new in.. well now being in this house for 8 months we have decided to take out the ceiling and walls and re do everything (minus the tub and toilet ) however, we have three children and this is our ONLY bathroom, so im worried about the time frame !
Hi Jennifer! It sounds like your situation is a lot like what our bathroom was. I can assure you that there is hope! 🙂 We did our bathroom over the course of a long period of time (2 months) because we did it ourselves in the evenings and we have another bathroom in the basement. That said, the most involved parts of our project were the electrical and the plumbing. If you’re not redoing the plumbing that will save a ton of time! If you were just doing the walls, paint, tile, fixtures and such I would say you could probably do it within a week depending on how handy you are. I’m happy to answer any other questions you have! -Jackie
Your bathroom project looks EXACTLY like mine! However…all my Anderson windows need to be replaced in my 1978 Ranch. I was wondering what kind of window you have there…my contractor says I need a vinyl stationary, opaque glass window and I would rather “not” have a stationary opaque glass window! (I bought the house that my parents built back in 1978….they lives there for 30 yrs before they sold it…to a family who lived there for a few yrs then rented it to their relatives…I’ve had to gut it because it was so trashed! 🙁 )
I love hearing when people have similar bathrooms they are working with! It’s really such a fun space to re-do. I’m not positive about the type of window exactly. I’ll have to look back in my records and get back to you. I agree with you on not having it stationary. It’s SO nice on a hot summer day to be able to open it up and get a breeze going. 🙂